Tutorial: How do I upload tracks to my cloud server? SingerInMe
Last modified: 1 January 2014
The feature of being able to automatically associate your tracks (audio and video) from your cloud to the lyrics or your playlist is available only for paid Gold subscription.
SingerInMe supports accessing and loading your tracks from all three (3) basic types of cloud server services:
Installing a local server on your device. [The most ideal solution. Recommended for Android, Mac Laptops/Desktops, and Windows Laptops/desktops. This solution does not work on iOS due to the limitations set by iOS.]
Cloud storage providers
There are several paid and free cloud storage service providers that allow you to store your files in the cloud and share them with others. Most of them require the user to download the file before an application can make use of it. Thus, preventing SingerInMe to play your tracks in an instant.
However, http://www.rackspace.com does allow you (SingerInMe.com) to directly access your audio file without having to download the audio file first; most ideal for SingerInMe.com.
Before you sign-up with any paid cloud storage providers, inquire if the URL they provide to access an audio file can be directly accessed by the browser without forcing the user to download the audio track.
Advantages:
You have one centralized storage place and therefore easy to maintain.
You can access your tracks from many devices.
The access to track is somewhat secured. Considering our example, for someone to guess the path to be s/7710631jks99zxy/ is relatively difficult.
Disadvantages:
You may have to pay a monthly fee.
Although unlikely but possible, should the server go down, you may not be able to perform.
You will have to set the path to the audio track individually for each lyrics.
You will incur cost to download your track especially on mobile devices.
Depending upon the speed of your internet connection, downloading the track could take a few seconds and may occur in blocks.
For example, consider the following:
You have uploaded the track The_Summer_Breeze_K.mp3 to your favorite cloud storage www.myCloudStorage.com (this name is fictitious) and the path to access the track is https://www.myCloudStorage.com/s/7710631jks99zxy/The_Summer_Breeze_K.mp3.
You want to play The_Summer_Breeze_K.mp3 in your browser and so you provide the path https://www.myCloudStorage.com/s/7710631jks99zxy/The_Summer_Breeze_K.mp3 to the browser.
If the browser starts playing The_Summer_Breeze_K.mp3, then this is the type of service provider you want. The approach of uploading your tracks to a cloud storage provider works for all devices (smartphones, tablets, phablets, laptops, desktops).
However, if you are told to download the track The_Summer_Breeze_K.mp3 then it defeats the purpose because SingerInMe needs direct access to the track and be able to play the track in an instant.
CAUTION: Check before you sign-up for a paid cloud service provider.
Once you have selected the cloud storage of your choice, the next step is to upload your tracks.
Remember to follow the naming conventions. Name all your tracks properly before uploading.
Naming your track(s):
SingerInMe.com supports association of a track to 8 different types and they are as follows (space followed by a one or more letters): " K" (Karaoke), " O" (Original), " VG" (Voice guide), " VGF" (Voice Guide Female), " VGM" (Voice Guide Male), " C1" (Custom 1), " C2" (Custom 2). When the track type is not appended by any of the above types, SingerInMe maps it to type None.
Considering the lyrics title to be Aankhon Hi Aankhon Mein Ishaaraa, assume you have the track(s) for this lyrics as follows:
aankho.mp4: karaoke video track
aankhoO.mp4: original video track
aankho.mp3 and aankho.wav: karaoke versions in two formats
aankhoO.mp3: original audio track
aankhoOneEightSlow.mp3: karaoke track that is 1/8th of a note slow
aankhoOneQNoteSlow.mp3: karaoke track that is 1/4th of a note slow
aankhoVG.mp3: voice guide version
aankhoMale.mp3: track where the male voice guide is provided
aankhoFemale.mp3: track where the female voice guide is provided.
Follow these simple steps when naming your tracks.
Name your track after the title of the song.
Keep the spaces from the title.
Append it by " K", that is a space followed by K for a karaoke track, by " O" for original audio track, by " C1" for One-Eight Note Slow, by " C2" for Quarter Note Slow, by _VG for voice guide, by _VGM for voice guide male, and by " VGF" for voice guide female. Note C1 and C2 are for custom convention that meets your needs. Be consistent when associating your tracks with C1 and C2 to help you easily identify the track types.
Append it by .mp3 for an mp3 track, .wav for a wav track, etc.
Taking the above steps, you should rename your tracks as follows:
Aankhon Hi Aankhon Mein Ishaaraa K.mp4 (previously named aankho.mp4). Aankhon Hi Aankhon Mein Ishaaraa O.mp4 (previously named aankhoO.mp4). Aankhon Hi Aankhon Mein Ishaaraa K.mp3 (previously named aankho.mp3). Aankhon Hi Aankhon Mein Ishaaraa K.wav (previously named aankho.wav). Aankhon Hi Aankhon Mein Ishaaraa O.mp3 (previously named aankhoO.mp3). Aankhon Hi Aankhon Mein Ishaaraa C1.mp3 (previously named aankhoOneEightSlow.mp3). Aankhon Hi Aankhon Mein Ishaaraa C2.mp3 (previously named aankhoOneQNoteSlow.mp3). Aankhon Hi Aankhon Mein Ishaaraa VG.mp3 (previously named aankhoVG.mp3). Aankhon Hi Aankhon Mein Ishaaraa VGM.mp3 (previously named aankhoMale.mp3). Aankhon Hi Aankhon Mein Ishaaraa VGF.mp3 (previously named aankhoFemale.mp3).
There are many paid and free website hosting providers that allow you to host websites. With respect to SingerInMe, the need is to leverage the infrastructure of the server that comes when hosting a website. All you need is a server where you can create a folder, for example, Music, load your tracks, and have SingerInMe access them directly without having you to download the track.
The approach of uploading your tracks to a web hosting provider works for all devices (smartphones, tablets, phablets, laptops, desktops). This is the most likely choice for iOS devices (iPhone, iPad, iPod touch) due to limitations imposed by iOS.
Advantages:
You have one centralized storage place and therefore easy to maintain.
You can access your tracks from many devices.
The access to track is somewhat secured. Considering our example, for someone to guess the path to be http://www.JohnA.freeiz.com/Music is relatively difficult. For more security you can name the folder Music to a string such as 'aldrszIMQPJEjld' and change it frequently. Remember, when you change the name of the Music folder, you also reset the path accordingly in Change Cloud Location.
You can set the path to the tracks globally and have SingerInMe automatically associate and load the tracks when you are on a lyrics page.
Disadvantages:
You may have to pay a monthly fee.
Although unlikely but possible, should the server go down, you may not be able to perform.
You will incur cost to download your track especially on mobile devices.
Depending upon the speed of your internet connection, downloading the track could take a few seconds and may occur in blocks.
You may have to take other provisions to prevent robots from traversing your website.
Website hosting provider: http://www.000webhost.com (SingerInMe is not affiliated with this and does not imply or guarantee it's service)
For example, consider a free website hosting service provider http://www.000webhost.com (SingerInMe is not affiliated with this and does not imply or guarantee it's service). Typically, when you create an account with free website hosting providers, you will be restricted in naming your website within the subdomain they provide. Consider for example the sub domain is freeiz.com and you wish to name your website as JohnA, the option to name your website will then be www.JohnA.freeiz.com; where JohnA is the name of your choice, if it is not already taken, under the subdomain freeiz.com.
In our scenario, considering that JohnA was not taken and you were successful in creating your account, you will then have your own website www.JohnA.freeiz.com. If you type www.JohnA.freeiz.com in your browser, you will be taken to your website and the default website page will be displayed.
For creating folders and uploading files, using http://www.000webhost.com, you will be instructed to go to http://members.000webhost.com and login using your login credentials. After you login, you will be presented a page as shown in the figure below.
Website provider - after you login
After login, follow these steps to create a directory (folder) Music and upload your karaoke, voice guide, and original tracks based upon your needs.
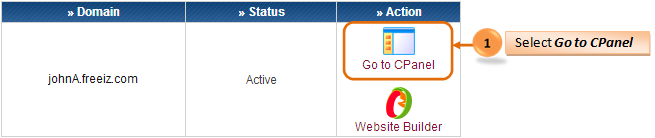
Select the Go to CPanel icon as shown in the figure below.
Select Go to CPanel icon
Scroll down to Files section and select Another File Manager as shown in the figure below. Select Another File Manager icon
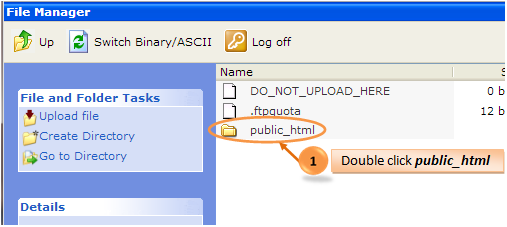
Double click public_html from the File Manager dialog as shown in the figure below.
Select public_html folder
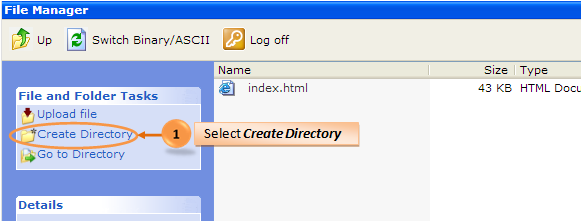
Select Create Directory from the File Manager dialog as shown in the figure below.
Select Create Directory
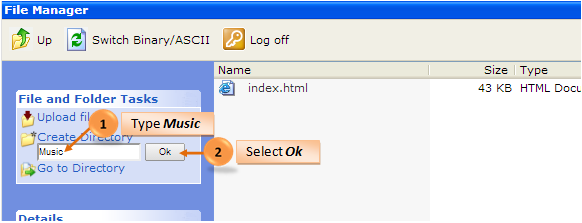
Type Music in the directory field and select Ok as shown in the figure below.
Type Music and select Ok
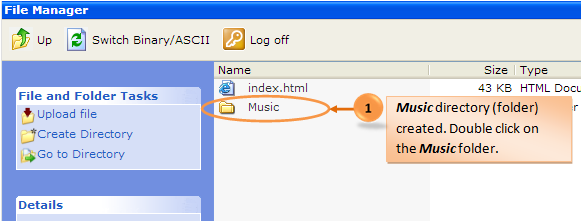
After selecting Ok, you should see the directory (folder) Music created as shown in the figure below. Double click on the Music folder.
Directory Music created
Before you upload the tracks name the tracks according to the convention described below.
Naming your track(s):
SingerInMe.com supports association of a track to 8 different types and they are as follows (space followed by a one or more letters): " K" (Karaoke), " O" (Original), " VG" (Voice guide), " VGF" (Voice Guide Female), " VGM" (Voice Guide Male), " C1" (Custom 1), " C2" (Custom 2). When the track type is not appended by any of the above types, SingerInMe maps it to type None.
Considering the lyrics title to be Aankhon Hi Aankhon Mein Ishaaraa, assume you have the track(s) for this lyrics as follows:
aankho.mp4: karaoke video track
aankhoO.mp4: original video track
aankho.mp3 and aankho.wav: karaoke versions in two formats
aankhoO.mp3: original audio track
aankhoOneEightSlow.mp3: karaoke track that is 1/8th of a note slow
aankhoOneQNoteSlow.mp3: karaoke track that is 1/4th of a note slow
aankhoVG.mp3: voice guide version
aankhoMale.mp3: track where the male voice guide is provided
aankhoFemale.mp3: track where the female voice guide is provided.
Follow these simple steps when naming your tracks.
Name your track after the title of the song.
Keep the spaces from the title.
Append it by " K", that is a space followed by K for a karaoke track, by " O" for original audio track, by " C1" for One-Eight Note Slow, by " C2" for Quarter Note Slow, by _VG for voice guide, by _VGM for voice guide male, and by " VGF" for voice guide female. Note C1 and C2 are for custom convention that meets your needs. Be consistent when associating your tracks with C1 and C2 to help you easily identify the track types.
Append it by .mp3 for an mp3 track, .wav for a wav track, etc.
Taking the above steps, you should rename your tracks as follows:
Aankhon Hi Aankhon Mein Ishaaraa K.mp4 (previously named aankho.mp4). Aankhon Hi Aankhon Mein Ishaaraa O.mp4 (previously named aankhoO.mp4). Aankhon Hi Aankhon Mein Ishaaraa K.mp3 (previously named aankho.mp3). Aankhon Hi Aankhon Mein Ishaaraa K.wav (previously named aankho.wav). Aankhon Hi Aankhon Mein Ishaaraa O.mp3 (previously named aankhoO.mp3). Aankhon Hi Aankhon Mein Ishaaraa C1.mp3 (previously named aankhoOneEightSlow.mp3). Aankhon Hi Aankhon Mein Ishaaraa C2.mp3 (previously named aankhoOneQNoteSlow.mp3). Aankhon Hi Aankhon Mein Ishaaraa VG.mp3 (previously named aankhoVG.mp3). Aankhon Hi Aankhon Mein Ishaaraa VGM.mp3 (previously named aankhoMale.mp3). Aankhon Hi Aankhon Mein Ishaaraa VGF.mp3 (previously named aankhoFemale.mp3).
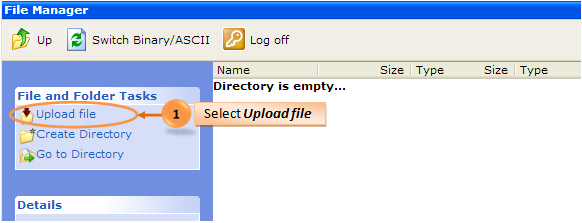
Select the Upload file link to upload your audio tracks as shown in the figure below.
Select Upload file
After having uploaded all your tracks and considering our example, set the Change Cloud Location to http://www.JohnA.freeiz.com/Music
Test if your SingerInMe account automatically loads the tracks from your website hosting server.
Log in to SingerInMe.com
Search and select a song title for which you uploaded the track to your website hosting server: http://www.JohnA.freeiz.com/Music
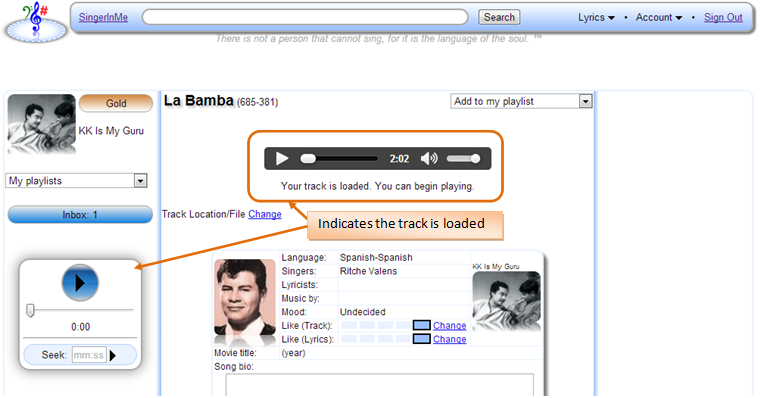
Once you are on the lyrics page you should see two (2) audio players and be able to play the track as shown in the figure below. The example below is for the song La Bamba and the karaoke track in http://www.JohnA.freeiz.com/Music folder was named La_Bamba_K.mp3.
Shows track is loaded
SingerInMe is not affiliated with any of the products listed in this table and does not imply or guarantee the products to any extent. Use these products at your own risk.
This is the most preferred approach for all devices other than iOS devices (iPhone, iPad, iPod touch), due to iOS limitations. Installing a server locally on your device will provide access to your tracks in an instant without incurring any cost to download the track or being concerned about the speed of the internet. However, installing a server locally requires some (very little) technical knowledge. If you have never installed an application on your device, then seek help from someone. The steps to take for installing a server locally for various devices are explained later.
Advantages:
Your tracks are local to the device and access to them is in an instant.
You do not incur any cost to download the tracks.
You do not have to be concerned about the speed of the internet.
You do not have to pay a monthly fee to store your tracks.
The tracks are secured. When you are not performing, turn off the local server on your device.
You can set the path to the tracks globally and have SingerInMe automatically associate and load the tracks when you are on a lyrics page.
Disadvantages:
You do not have one centralized place for your tracks such that they can be accessed from other devices.
You will need to know how to download and install a program and follow the steps (described next) to setup your local server.
Installing kWS - Android Web Server
Please follow these steps to make use of the kWS - Android Web Server application on your Android device.
Download the application kWS - Android Web Server.
Select Play store icon.
Select the Search/Magnify icon.
Type in kWS Android Web. You could type in http Server to see what other servers are available for you to install. Please note the steps outlined here are only applicable to kWS - Android Web Server.
Select kWS - Android Web Server.
Select Install.
Select Accept to begin downloading the kWS - Android Web Server application.
Setup the application kWS - Android Web Server.
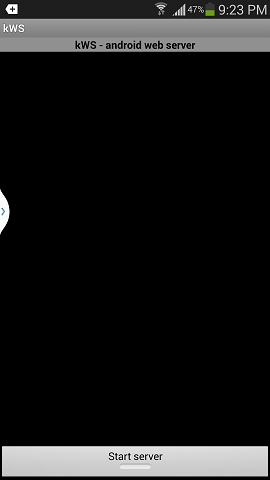
Select Open to run the application. Or, find the kWS - Android Web Server application on your Android device and select to launch it. Your screen will appear as shown in the figure below.
Application kWS - Android Web Server launched
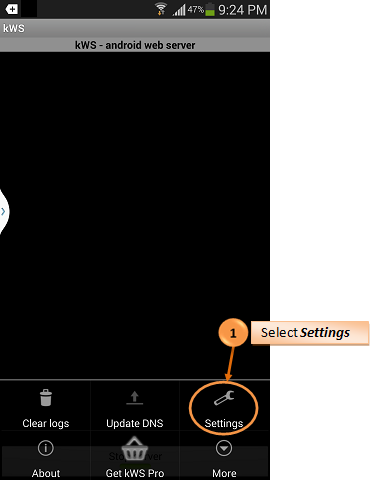
Select the Menu button on your device and then select Settings as shown in the figure below. On some Android devices there is a dedicated Menu button and on some there is a soft Menu button.
Select the Menu button and then select Settings
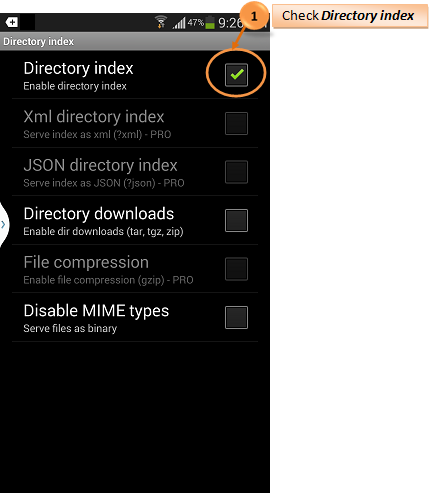
Scroll down and select Directory index as shown in the figure below.
Select Directory index
Check the Directory index check box as shown in the figure below.
Check Directory index check box
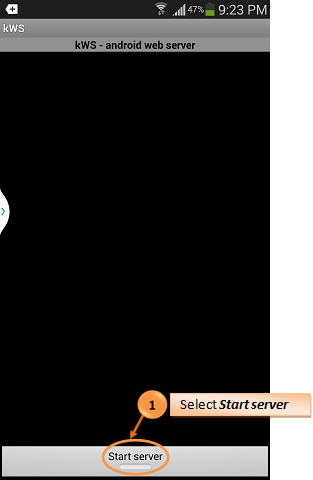
Select the Previous button twice on your device to go to the home page of kWS - Android Web Server as shown in the figure below.
Application kWS - Android Web Server home page
Select Start Server as shown in the figure below.
Select Start server
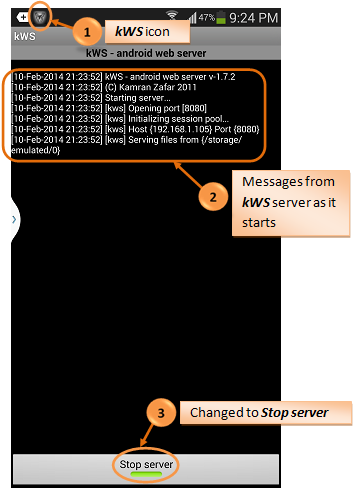
Once the server is started, you should see the following changes as shown in the figure below.
Application kWS - Android Web Server has started
Test the application kWS - Android Web Server.
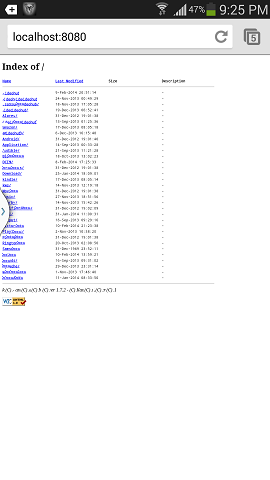
Go to the home page of your device and launch your favorite browser. Type http://localhost:8080 in your browser and hit the Return key. The browser may change the path from http://localhost:8080 to localhost:8080.You should then see a listing of various folders on your Android device as shown in the figure below. One folder you will see is Music.
Type http://localhost:8080 in any browser on your device
Upload the tracks to your android device.
Connect your device (smartphone, tablet, phablet) to a computer. Wait for a few seconds till the computer recognizes your device.
Once your device is recognized by the computer, open the folder that represents your device and navigate to the Music folder.
Copy your tracks to the Music folder. Remember to follow the naming conventions. Name all your tracks properly before uploading.
Naming your track(s):
SingerInMe.com supports association of a track to 8 different types and they are as follows (space followed by a one or more letters): " K" (Karaoke), " O" (Original), " VG" (Voice guide), " VGF" (Voice Guide Female), " VGM" (Voice Guide Male), " C1" (Custom 1), " C2" (Custom 2). When the track type is not appended by any of the above types, SingerInMe maps it to type None.
Considering the lyrics title to be Aankhon Hi Aankhon Mein Ishaaraa, assume you have the track(s) for this lyrics as follows:
aankho.mp4: karaoke video track
aankhoO.mp4: original video track
aankho.mp3 and aankho.wav: karaoke versions in two formats
aankhoO.mp3: original audio track
aankhoOneEightSlow.mp3: karaoke track that is 1/8th of a note slow
aankhoOneQNoteSlow.mp3: karaoke track that is 1/4th of a note slow
aankhoVG.mp3: voice guide version
aankhoMale.mp3: track where the male voice guide is provided
aankhoFemale.mp3: track where the female voice guide is provided.
Follow these simple steps when naming your tracks.
Name your track after the title of the song.
Keep the spaces from the title.
Append it by " K", that is a space followed by K for a karaoke track, by " O" for original audio track, by " C1" for One-Eight Note Slow, by " C2" for Quarter Note Slow, by _VG for voice guide, by _VGM for voice guide male, and by " VGF" for voice guide female. Note C1 and C2 are for custom convention that meets your needs. Be consistent when associating your tracks with C1 and C2 to help you easily identify the track types.
Append it by .mp3 for an mp3 track, .wav for a wav track, etc.
Taking the above steps, you should rename your tracks as follows:
Aankhon Hi Aankhon Mein Ishaaraa K.mp4 (previously named aankho.mp4). Aankhon Hi Aankhon Mein Ishaaraa O.mp4 (previously named aankhoO.mp4). Aankhon Hi Aankhon Mein Ishaaraa K.mp3 (previously named aankho.mp3). Aankhon Hi Aankhon Mein Ishaaraa K.wav (previously named aankho.wav). Aankhon Hi Aankhon Mein Ishaaraa O.mp3 (previously named aankhoO.mp3). Aankhon Hi Aankhon Mein Ishaaraa C1.mp3 (previously named aankhoOneEightSlow.mp3). Aankhon Hi Aankhon Mein Ishaaraa C2.mp3 (previously named aankhoOneQNoteSlow.mp3). Aankhon Hi Aankhon Mein Ishaaraa VG.mp3 (previously named aankhoVG.mp3). Aankhon Hi Aankhon Mein Ishaaraa VGM.mp3 (previously named aankhoMale.mp3). Aankhon Hi Aankhon Mein Ishaaraa VGF.mp3 (previously named aankhoFemale.mp3).
Associate your SingerInMe account to the tracks on your local server.
A few notes to take into account.
The path to your local server is http://localhost:8080
The path to the tracks on your local server is http://localhost:8080/Music
In order for SingerInMe to automatically load the track from your local server and associate with the lyrics, the local server has to be running.
You run the local server by selecting the kWS icon from your device and then selecting Start server.
If the kWS server is running, you should see the kWS icon in the icon bar.
After having uploaded all your tracks and considering our example, set the Change Cloud Location to http://localhost:8080/Music. Note to type the name exactly, type Music and not music.
Test if your SingerInMe account automatically loads the tracks from your local server.
Log in to SingerInMe.com
Search and select a song title for which you uploaded the track to your local server: http://localhost:8080/Music
Once you are on the lyrics page you should see two (2) audio players and be able to play the track as shown in the figure below. The example below is for the song La Bamba and the karaoke track in http://localhost:8080/Music folder was named La_Bamba_K.mp3.
Shows track is loaded
Installing MAMP on Mac Laptop/Desktop
THIS SECTION IS BEING WORKED UPON
Please follow these steps to make use of the MAMP application on your Mac Laptop/Desktop.
Download the application MAMP.
Setup the application MAMP.
Test the application MAMP.
Upload the tracks to your Mac Laptop/Desktop.
Associate your SingerInMe account to the tracks on your local server.
Test if your SingerInMe account automatically loads the tracks from your local server.
Installing WAMP on Windows Laptop/Desktop
THIS SECTION IS BEING WORKED UPON
Please follow these steps to make use of the WAMP application on your Windows Laptop/Desktop.
Download the application WAMP.
Setup the application WAMP.
Test the application WAMP.
Upload the tracks to your Windows Laptop/Desktop.
Associate your SingerInMe account to the tracks on your local server.
Test if your SingerInMe account automatically loads the tracks from your local server.
Automatically associate the tracks in the cloud with all your lyrics
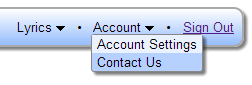
This is the most preferred way and is done by setting the cloud location to your tracks in your Account Settings. Select Account→Account Settings as shown in figure below. From Account menu select Account Settings
On the Account Settings page, select the Change Cloud Location link as shown in the figure below.
Change Cloud Location link on Account Settings page
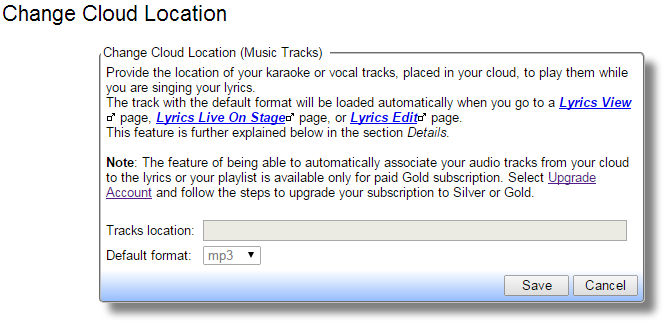
After clicking the above link, you will be taken to the Change Cloud Location page as shown in the figure below.
Change Cloud Location (Music Tracks) dialog
Set the Tracks location field. Examples are:
http://www.cloudServiceProvider/Music [Cloud service provider]
http://www.JohnA.freeiz.com/Music [Web site host provider]
http://localhost:8080/Music [Installing local server e.g. kWS on Android]
Setting the Default format field.
Set the default to the format used most frequently by the tracks you have uploaded in your cloud server.
SingerInMe will load the tracks in the default format first followed by the following formats: mp3, m4a, oga, ogg, weba, flac, and then wav.
CAUTION: iOS has limitations and does not offer the best user experience with respect to SingerInMe on many fronts. For iOS devices (iPhone, iPad, iPod touch), only one track with the corresponding Default format will be loaded.
 does allow you (SingerInMe.com) to directly access your audio file without having to download the audio file first; most ideal for SingerInMe.com.